gojs节点水平排列,连接线上加文字
温馨提示:
本文最后更新于 2022年11月02日,已超过 1,147 天没有更新。若文章内的图片失效(无法正常加载),请留言反馈或直接联系我。
效果图如下

本来打算蛇形排列,但是引入js老是报错,所以采用平行排列
代码如下
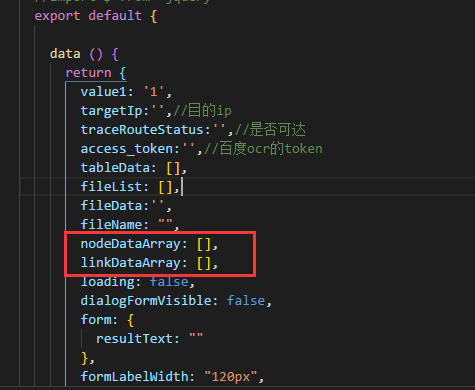
定义一个div,定义两个参数

 <el-row  height="100%">
            <el-col :span="24">
              <div id="parentDiv">
                <div id="mygoChart" class="mygoChart" :style="{'width': '100%',height:mygoChartHeight+'px'}"></div>
              </div>
            </el-col>
          </el-row>
//初始化gojs
initGoJS() {
var $ = go.GraphObject.make; // for conciseness in defining templates
const computerImg = require("./../assets/img/route.png");
const routeImg = require("./../assets/img/computer.png");
var myDiagram = $(
go.Diagram,
"mygoChart", // create a Diagram for the DIV HTML element
// {
// //isTreePathToChildren: false, // links go from child to parent
// // layout: $(SerpentineLayout) // defined in SerpentineLayout.js
// }
{
"undoManager.isEnabled": true,
layout: $(
go.TreeLayout, // 1个特殊的树形排列 Diagram.layout布局
{
angle: 0, //90可以竖直排列
layerSpacing: 60
}
)
}
);
myDiagram.nodeTemplate = $(
go.Node,
"Vertical",
{ locationSpot: go.Spot.Center },
$(
go.Picture,
"Vertical",
computerImg,
// 通常情况下,图片需要有明确的宽度。当没有设置图片路径 或者 图片是透明的时候会显示红色背景,
{ width: 60, height: 60,margin:new go.Margin(0, 0, 0, 0) }, //设置节点之间的边距
new go.Binding("source", "url")
),
$(
go.TextBlock,
//"Default Text111",
{
stroke: "#909399",
font: "bold 16px sans-serif",
textAlign: "center"
}, // 初始化文本样式
new go.Binding("text", "text")
), // 绑定数据的key
{
// define a tooltip for each node that displays its information
toolTip: $(
"ToolTip",
$(
go.TextBlock,
{ margin: 4, font: " 16px sans-serif" },
// "Default Text111",
new go.Binding("text", "", function(model, obj) {
var x = obj.panel.adornedPart; // the object that the mouse is over
return x.data.ipstr;
})
)
)
}
);
myDiagram.linkTemplate =
$(go.Link, // slightly curved, by default
{ routing: go.Link.Bezier, corner: 0},
$(go.Shape, { strokeWidth: 2, stroke: "#555" }),
$(go.Shape, {toArrow: 'OpenTriangle'}),
$(go.TextBlock, // show the second path object name, if any
{ segmentOffset: new go.Point(0, -12) },//设置文字在线之上
new go.Binding("text", "text"))
);
this.nodeDataArray = [
{ key: 1, text: "美国",url : require("./../assets/img/route.png")},
{ key: 2, text: "加拿大" ,url:require("./../assets/img/computer.png")},
{ key: 3, text: "中国 香港 香港" },
{ key: 4, text: "中国 陕西 西安" },
{ key: 5, text: "中国 北京 北京"},
{ key: 6, text: "中国 上海 上海" },
{ key: 7, text: "中国 深圳 深圳" },
{ key: 8, text: "中国 深圳 深圳" },
{ key: 9, text: "中国 深圳 深圳" },
{ key: 10, text: "中国 深圳 深圳1" },
{ key: 11, text: "中国 深圳 深圳2" },
{ key: 12, text: "中国 深圳 深圳3" },
{ key: 13, text: "中国 深圳 深圳4" },
{ key: 14, text: "中国 深圳 深圳5" },
{ key: 15, text: "中国 深圳 深圳6" }
];
this.linkDataArray = [
{ from: 1, to: 2,text :"39ms" },
{ from: 2, to: 3,text :"63ms"},
{ from: 3, to: 4,text :"59ms"},
{ from: 4, to: 5},
{ from: 5, to: 6},
{ from: 6, to: 7},
{ from: 7, to: 8},
{ from: 8, to: 9},
{ from: 9, to: 10},
{ from: 10, to: 11},
{ from: 11, to: 12},
{ from: 12, to: 13},
{ from: 13, to: 14},
{ from: 14, to: 15},
];
myDiagram.model = new go.GraphLinksModel(
this.nodeDataArray,
this.linkDataArray
);
}直接在别的地方调用即可
正文到此结束
- 本文标签: 其他
- 本文链接: http://www.365codemall.com/article/28
- 版权声明: 本文由李俊杰原创发布,转载请遵循《署名-非商业性使用-相同方式共享 4.0 国际 (CC BY-NC-SA 4.0)》许可协议授权


